Holiday Art Sale!
The holiday sale is over, and I want to thank all those who purchased my art!
If you are interested in purchasing my art, please visit my webpage and click on each image where the price or status will be visible.
THANKS SO MUCH!!!
Sunday, November 24, 2019
Thursday, April 18, 2019
Getting Ready for Travel!
It's time again to think about travel and tinkering with a new handmade painting platform. My friends know that I love to tinker with making art gear and sometimes I enjoy that part more than actually painting! I really like all the designing and brainstorming to make something simple and inexpensive.
I travel several times each year, which always revolve around plein air painting! I'm getting ready for a trip coming up next month to Cape Ann, Massachusetts and we will be flying. We got the cheapest flights, and I don't intend on checking a bag. We are renting a house which has a washer and dryer, so I am going to try to pack few clothes. But I also need to have a smaller amount of art supplies, since everything will need to be carry-on luggage.
While I enjoy working in oils and pastels, and have traveled with both, I decided to get out my dusty watercolor paints and jump on the "urban sketcher" bandwagon. I've been studying up on this style of painting, which uses permanent ink to sketch the scene, and may or may not end up with watercolor washes to enhance the design. I tried learning traditional watercolor painting about 15 years ago, but found it tedious. Because I can be much more free with the sketcher style of painting, I'm going to try it for this trip. Here's a shot of all the gear, which I will detail later:
 Watercolor gear travels very easily. I have a travel tripod and decided to made a platform for it to work on the sketches. I can also use the platform on my lap, if I decide that is more comfortable. I thought you might enjoy seeing my project and the gear I plan on taking.
 For the platform, I am using a piece of thin Gatorboard which is a very rigid type of foam core board. I may be using loose watercolor paper and so I covered the board with clear Contact paper to protect the board's paper from moisture and to make it easier to remove the tape holding down the paper. I also wanted some type of ridge along the sides and bottom so that there was a lip to keep things from rolling off the board. I attached one layer of mat board, about an inch wide, to the edges. I wanted something that was fairly flat so it wouldn't be in the way when drawing.
 To attach the board to the tripod via the quick connect plate, I mounted a t-nut to a 3/8" thick, 9" x 2.5" wood board. Then glued that wood to the underside of the Gatorboard. No real need to use screws for this. Then I put some decorative Duck tape onto the wood and surrounding Gatorboard for strength and protection. Overall, it is very lightweight but very sturdy.
 I ran out of one roll of Duck tape, and had to use another design to finish!
 Here is my travel tripod in its bag, along with a 16" laptop shoulder bag. The platform fits perfectly into this bag, along with most of the other gear.
 They fit perfectly into my tiny carry-on luggage, although I may not take the shoulder bag on this trip, as I will be taking a backpack also.I figured I would put all the art supplies (the heavier items) in the wheeled luggage, and put my lightweight clothes into my backpack for traveling. I am likely to have my luggage searched because of all the weird art things. Seems like this happens every trip. So I'd like to have all the suspicious looking things in one bag.


 Here a 7x10" Arches watercolor block fits nicely and stays put with the mat board edging.


In this tin are my pens, pencil, several brushes, some white gouache, and in the lid, a flexible ruler, and pieces of artist's tape. I'll take a small roll of tape also, but having a few pieces in tin is a easy place to store tape (which gets used over and over). I have several brush cases but this jewelry tin was perfect.


I travel several times each year, which always revolve around plein air painting! I'm getting ready for a trip coming up next month to Cape Ann, Massachusetts and we will be flying. We got the cheapest flights, and I don't intend on checking a bag. We are renting a house which has a washer and dryer, so I am going to try to pack few clothes. But I also need to have a smaller amount of art supplies, since everything will need to be carry-on luggage.
While I enjoy working in oils and pastels, and have traveled with both, I decided to get out my dusty watercolor paints and jump on the "urban sketcher" bandwagon. I've been studying up on this style of painting, which uses permanent ink to sketch the scene, and may or may not end up with watercolor washes to enhance the design. I tried learning traditional watercolor painting about 15 years ago, but found it tedious. Because I can be much more free with the sketcher style of painting, I'm going to try it for this trip. Here's a shot of all the gear, which I will detail later:


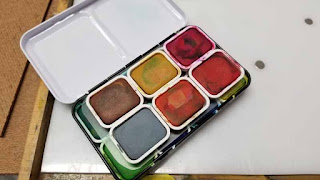
Here's some actions shots! Here I have taped down a piece of watercolor paper on the contact paper covered platform. I've put a piece of kitchen cupboard liner mesh under my watercolor palette to it doesn't move around. I have a tiny water jar that has a magnet on the bottom, so that can stick nicely onto my palette. (I'm taking larger leak-proof water containers also).


I'll also take a neat 3.9 x 9.8" Arches watercolor block. Looks like a great shape for painting landscapes! And some Arches 300# paper cut into 5x7" and 4x6". I always take way too many painting surfaces, but I'll have choices:


Here are more views of stuff I'll take. I do want to take this kit out into the field in the next few weeks to see what I need to tweak!


Thursday, March 14, 2019
Hey! I'm Still Painting!
Hi! Wow, it's been a while, hasn't it? I'm still painting, but have been too lazy to do a real blog post, and usually just post on Instagram now. Please follow me there if you want to see what I've been up to. https://www.instagram.com/nancylvance/
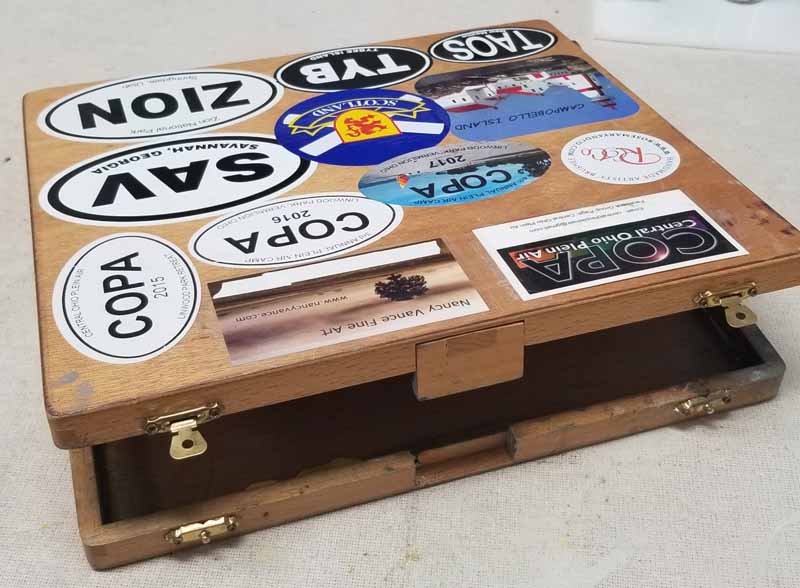
But first, here's a post for you plein air artists out there who may need a new painting box. These are my personal opinions - take it or leave it. :
But first, here's a post for you plein air artists out there who may need a new painting box. These are my personal opinions - take it or leave it. :
A DISCUSSION ON PAINTING BOXES
One of my good friends, who I travel and paint with, is in the market
for a new painting box before one of our upcoming trips that involved
airplanes. I’ve been a plein air gear hoarder for a while and thought I would
put together a list of good and bad models that I had some experience with.
She was thinking of just repairing her current model, but it was still
a large box to put into a suitcase. I suggested that she think about whether to
buy a new regular box, or just something small for traveling. Could she adjust
to painting on a box with a smaller mixing area by cleaning the palette more
often?
I also suggested to put out a message to our local painting group that
she was looking for a used box for sale. I have a running search on eBay for
painting boxes and gear, which alerts me to new items. Occasionally some nice
ones (new and used) show up.
Below I write about wet panel carriers, painting boxes, and
tripods. All but one painting box below requires a tripod. I prefer the “clam shell”
style where the mixing pallet is directly below the painting. Other styles have
the mixing pallet hanging off the tripod legs, lower down – near the hips of
the painter. The painting is held at eye level on a device on the top of the
tripod. I always recommend buying a quality tripod, which can last a long time.
Good name brand tripods will also have repair parts available, if needed.
WET PANEL CARRIERS
Raymar. Great travel wet
panel carriers in many sizes: https://www.raymarart.com/Wet-Painting-Carriers-Wet-Panel-Carriers-s/21.htm
PanelPak. These work very
nicely if you are only going to carry two panels home. http://www.panelpak.com/
NOTE: The only brand that has a good attached wet
panel holder are the EasyLs at Artwork Essentials (see below).
PAINTING BOXES
U-Go boxes by New Wave Art. Two
of my local friends have these. Nice! Available also on Amazon, ebay, etc. I’d
buy one if I needed a new one 😉
Strada Easels. Great
customer service. I own the Micro
and Mini, both with side trays. I also own the Tripod tray but have not used it
in the field. I owned the original (largest) Strada, but thought it was too
heavy for me. Bullet proof, simple, efficient design. Love them.
EasyL at Artwork Essentials.
Great customer service. I own the 11x14 Pro and the Pro-chade (no longer made,
but one of my favorites). I bought a Classic Mini on ebay that I never used it
and sold it.
Judsons Art Outfitters. Great
company. I owned three: the Cigar Box, the 9x12 Guerilla Box, and the 5x7 Thumb
Box. I sold all but the tiny one. Nicely made, fairly lightweight, but are made
to haul all the tubes inside, so bulky boxes. They have a few new styles that
copy the type that hangs on tripod legs.
Joshua Been, Prolific Painter.
Two of my local friends have or had the Daytripper Model. Both had some
complaints and one sold hers. I had the Fly on the Wall and sold it. Didn’t
like it, cheaply made, but costly. Terrible customer service. These are the pallet
style that hangs on the tripod legs and the panel holder is up higher. I always
felt like I had my belly right into the wet pallet.
En Plein Air Pro. Another
friend had one of these, but it seems like he didn’t use it for long. Very
lightweight setup, but lots of plastic. Tripod is very cheaply made. Another style
where the pallet hangs on the tripod legs and the panel holder is up higher.
James Coulter, Art Box and Panel.
Been around a long time and has been copied by many. Looks heavy. Again, this
is the style that hangs on the tripod legs and the panel holder is up
higher: https://artboxandpanel.com/
Sienna Boxes. These are very
reasonably priced. A couple people in my group had these. Nicely made, but lots
of wood and heavy. Available on Amazon and ebay or direct.
Ben Haggett's Alla Prima Pochade.
Beautifully made, but lots of wood and heavy. Custom ordered.
Edge Pro Gear. Some of the
“pros” use these. Look just like a laptop case. Two sizes.
Open Box M. One of the
original designs for clam shell style painting boxes. Very lightweight but
expensive. Lots of fiddly wingnuts. I had one but sold it.
Soltek. This is an
all-in-one painting box, like the French easel, but all aluminum. Very
expensive. I bought a used model but felt it was really heavy and sold it. The
legs are pretty finicky and are hard to close. http://www.soltekarts.com/
See this video review by Stefan Baumann of the Open Box M, Strada and
EasyL: https://www.youtube.com/watch?v=jgqtAQ1g4l8
TRIPODS
For tripods, buy a quality brand and it will last for years. Look for a
complete tripod with a ball head and quick release plate. You don’t need the
type that are used with video cameras with the arm used for panning the camera.
Think about how small it folds up to fit inside a suitcase or backpack. I always
recommend going to a local photo supply shop and see what they have in person. But
there are many places online to buy. Once I narrow down the model I like, I
google and can usually find a pretty good deal. Expect to pay between $120- 190
(you are worth it!! 😉 ). I
prefer Manfrotto or Benro brands. I bought an off-name brand, which was carbon
fiber (lighter weight). But I found that because it was a smaller travel size,
the weight was not that much different than a standard aluminum version.
Below is a good model that I recommend, which that folds to about 16”.
Manfrotto Be Free Compact Travel Easel:
https://www.bhphotovideo.com/c/product/1367497-REG/manfrotto_mkbfrta4rd_bhus_befree_advanced_travel_tripod.html
Tuesday, July 31, 2018
Tinkering in the Studio
If you have followed me much here, you might notice I seem to tinker with artist gear more than painting! I like tinkering and building things. Recently I was, again, attempting to learn how to use gouache (opaque watercolor) paint. It seemed like the gear should have been simpler, but it wasn't, so I played around to make it more user friendly.
Although I have built many different setups from wood, I didn't feel like reinventing the wheel this time. I have an older EasyL brand painting box that I love. It's been all over the world with me. They don't make this model anymore.

 But newer shiny painting boxes have come on the market over the years since I bought this little box. I've bought and sold numerous brands and models for different reasons or mediums. I think I own about 10 different models right now. They all have their uses, but this little one sat on the shelf. So I decided to make it work for an exclusive gouache painting box. I work very small with gouache because of the fast drying time making it difficult to paint larger than 6x8 (in my opinion!).
The gouache I was using is the Caran d'Ache pan set which is contained in a nice metal box, but that makes it heavy. The little pans of each color pop out easy enough so I found an empty metal watercolor box that they all fit into. Perfect fit!!


 To make it convenient when painting, I needed to organize the inside the wooden box. I took a piece of HDPE 1/8" plastic sheet and cut it to size. This material is a hard plastic which I use in several of my other painting boxes as the palette where I mix paint. It can be cut with a utility knife and holes can be drilled with a cordless drill. The micro magnets are powerful little things that many artists use to keep things steady on their gear. Because the plastic is a tiny bit flexible, the magnets popped into the holes I drilled and stayed fine without glue. They are the little rounds things shown in the plastic below.

 I am left handed, so I arranged the locations of the magnets in a way that worked best for me. They hold onto the metal box with the pan paints, a metal tray for water to clean brush (top left), and a tiny jar to hold clean water (to use to dip the end of the brush to help the paint flow). I added a little magnetic clip to the metal tray which holds a folded paper towel that will be wet (to place any tube paint to keep it from drying too fast). The setup works well on its own on a tabletop. The extra open white area of the HDPE will serve as an additional paint mixing area.
 Once popped into the box, it makes a neat little package! The sketchbook or paper fits nicely in the upper area. The wood box has an additional side wing that attaches to the left side of the box with space to lay my brushes and tubes of paint. The box is fitted on the bottom with a tripod nut and will be attached to my travel tripod when I am painting standing outside.
Seems like a pretty good setup! Now I need to get better with these paints!! ;-)
Although I have built many different setups from wood, I didn't feel like reinventing the wheel this time. I have an older EasyL brand painting box that I love. It's been all over the world with me. They don't make this model anymore.

The gouache I was using is the Caran d'Ache pan set which is contained in a nice metal box, but that makes it heavy. The little pans of each color pop out easy enough so I found an empty metal watercolor box that they all fit into. Perfect fit!!


 |
| My small gouache painting with credit to Jim Glover for use of his photo reference |
I've Retired!!
I recently retired! YAY! I'd worked in the engineering field for over 30 years and was lucky to have been employed by a great company for the last 21 1/2 yrs, with great benefits including a real pension in addition to a 401k with an 8% match.
So on my 62nd birthday I retired! Now I am a lady of leisure doing whatever I feel like!!! Maybe that will include more time to post on the blog again. I got so lazy by just posting on Instagram which posts automatically on my Facebook artist page. Hopefully I can now do both the blog and social media!
So on my 62nd birthday I retired! Now I am a lady of leisure doing whatever I feel like!!! Maybe that will include more time to post on the blog again. I got so lazy by just posting on Instagram which posts automatically on my Facebook artist page. Hopefully I can now do both the blog and social media!
Wednesday, May 16, 2018
Brown County Indiana Retreat
Since I seem to be forgetting to post anything on this blog, I will share with you my friend, travel and painting buddy's blog post of our recent trip to historic Brown County Indiana at the retreat led by my other friend Michael Chesley Johnson! She also links to Michael's blog with his report on the retreat. Click on the link below:
http://www.fromcurioustocreative.com/art-colony-pilgrimage/
I knew only a tiny bit about Brown County and always wanted to learn more. I asked Michael to figure out a retreat there, since he knew a local painter, Douglas Runyon, an expert on the area. It was really great to have a retreat with Michael that didn't involve airline travel! This area was about 3 1/2 hrs from home. Douglas was a wealth of information, and certainly the only way we could have had access to the best parts of this area!
Although it was considered a painting retreat, I couldn't seem to get in the groove to paint (but that is ok, as I needed a vacation one way or another!). Also, because of the late, late spring in Ohio, I had only been able to paint outside once before heading west. I tried to do a couple pastels and oils, but wasn't happy with my work. The only piece I ended up with was from a photograph taken in Brown County State Park. I painted a 6x8 pastel at the table of our cabin one afternoon. These pics are from two different cellphones. The top pic shows my cellphone with photo, the value sketch (trying to do this for all paintings!), and the final painting (which is a bit washed out in this photo).
 Below is another photo, but still doesn't show it true. But I am happy with how this painting came out.

http://www.fromcurioustocreative.com/art-colony-pilgrimage/
I knew only a tiny bit about Brown County and always wanted to learn more. I asked Michael to figure out a retreat there, since he knew a local painter, Douglas Runyon, an expert on the area. It was really great to have a retreat with Michael that didn't involve airline travel! This area was about 3 1/2 hrs from home. Douglas was a wealth of information, and certainly the only way we could have had access to the best parts of this area!
Although it was considered a painting retreat, I couldn't seem to get in the groove to paint (but that is ok, as I needed a vacation one way or another!). Also, because of the late, late spring in Ohio, I had only been able to paint outside once before heading west. I tried to do a couple pastels and oils, but wasn't happy with my work. The only piece I ended up with was from a photograph taken in Brown County State Park. I painted a 6x8 pastel at the table of our cabin one afternoon. These pics are from two different cellphones. The top pic shows my cellphone with photo, the value sketch (trying to do this for all paintings!), and the final painting (which is a bit washed out in this photo).


Sunday, January 21, 2018
Some More Small Paintings
I did a few more paintings and needed to get them posted for you to see! I've sure had a good run this winter - as they say - you have to put in the time to get the results. I've got some other things to attend to now, so it may be a few weeks for something new. Hope you enjoy viewing my art!
 |
| "Egg with Red Striped Towel", 6x6", oil on panel |
 |
| "Clementine Dreams of Marmalade", 6x8", oil on panel |
 |
| "Big Dreams", 6x8", oil on panel |
 |
| "Almost a Fit", 6x8", oil on panel |
Monday, January 01, 2018
New Year Look Back
I usually take a tally on last year's art, sales, and events at the end of the year. But when I looked back on my notebook, I hadn't added any notes since my trip to Florida last winter!
I do know that I was very lucky to have sold 4 paintings last year, enjoyed painting with my Plein air pals and doing a little bit of traveling. I really should keep an art journal this year.
I believe 2018 holds much fun and adventure!!!
I do know that I was very lucky to have sold 4 paintings last year, enjoyed painting with my Plein air pals and doing a little bit of traveling. I really should keep an art journal this year.
I believe 2018 holds much fun and adventure!!!
Friday, December 29, 2017
Busy painter on this mini-vacation!
I keep rolling along and have painted a few more. All are 6x8" oil on Gessobord.
 |
| An Artist's Breakfast |
 |
| Peaches! |
 |
| Summer on the Porch |
Monday, December 18, 2017
More Small Paintings
Here's a few more paintings! I'm having lots of fun!
 |
| More Guacamole!, 6x8 oil on board |
 |
| Gingko Leaf with Pots, 6x8 oil on board |
 |
| Apples, 6x8 oil on board (applied with painting knife) |
Wednesday, December 13, 2017
New Exhibit - 3 Points in Time, McConnell Arts Center
I was recently accepted into an exhibit opening January 4th at the McConnell Art Center, Worthington Ohio. The theme is interesting - 3 points in time on an artist's journey. 37 artists submitted 52 sets (set = 3 items) of work (some submitted more than one set). 20 artists were accepted.
The reception will be open to the public on Thursday, January 11, 6:30-8pm in the main gallery. If you are in the area, please come! The exhibit will hang until March 18.
Below is a snapshot of my three pieces. (They may be hung differently at the gallery.) We were required to send 5 sentences that describe what led us to changes between the 3 pieces.

RECEPTION
McConnell Arts Center
777 Evening Street
Worthington
Thursday, January 11, 6:30-8:00 (main gallery)
Brian Johnston (judge for awards)
MAC hours
Tues-Thur 10am- 9pm
Friday- Sat 10am-5pm
Sun 12pm-5pm
Kitchen Art and More Still Life
Going along with the recent flow of painting, here are a couple more still life! Having great fun with these small paintings. I've taken lots of photos for more paintings.
But first, I want to share something I painted specifically for my kitchen wall. I recently painted over the "builder beige" walls with a lighter warm taupe. I needed something on the only open wall in that area. Below you'll see my collection of 1/2 pint latex "oops" paint. I pick these up at the hardware store paint department. These "oops - wrong color" pots sell for a buck or two. I've used these along with some tube artist acrylic paint on stretched canvas. I don't usually use stretched canvas, but wanted something larger and these were affordable. I used brushes and palette knife.
 Here's the winner on my wall! I wanted something subtle and soft. PERFECT.


 And this shows the giant piece of 1/4" acrylic I was given. I use it as my mixing palette.

But first, I want to share something I painted specifically for my kitchen wall. I recently painted over the "builder beige" walls with a lighter warm taupe. I needed something on the only open wall in that area. Below you'll see my collection of 1/2 pint latex "oops" paint. I pick these up at the hardware store paint department. These "oops - wrong color" pots sell for a buck or two. I've used these along with some tube artist acrylic paint on stretched canvas. I don't usually use stretched canvas, but wanted something larger and these were affordable. I used brushes and palette knife.


Next, I tried a different palette, but this is too bright for my kitchen. It looks pretty good hanging in my studio though!

Here are the newest 6x8" oils on Ampersand Gessobord.


Subscribe to:
Posts (Atom)